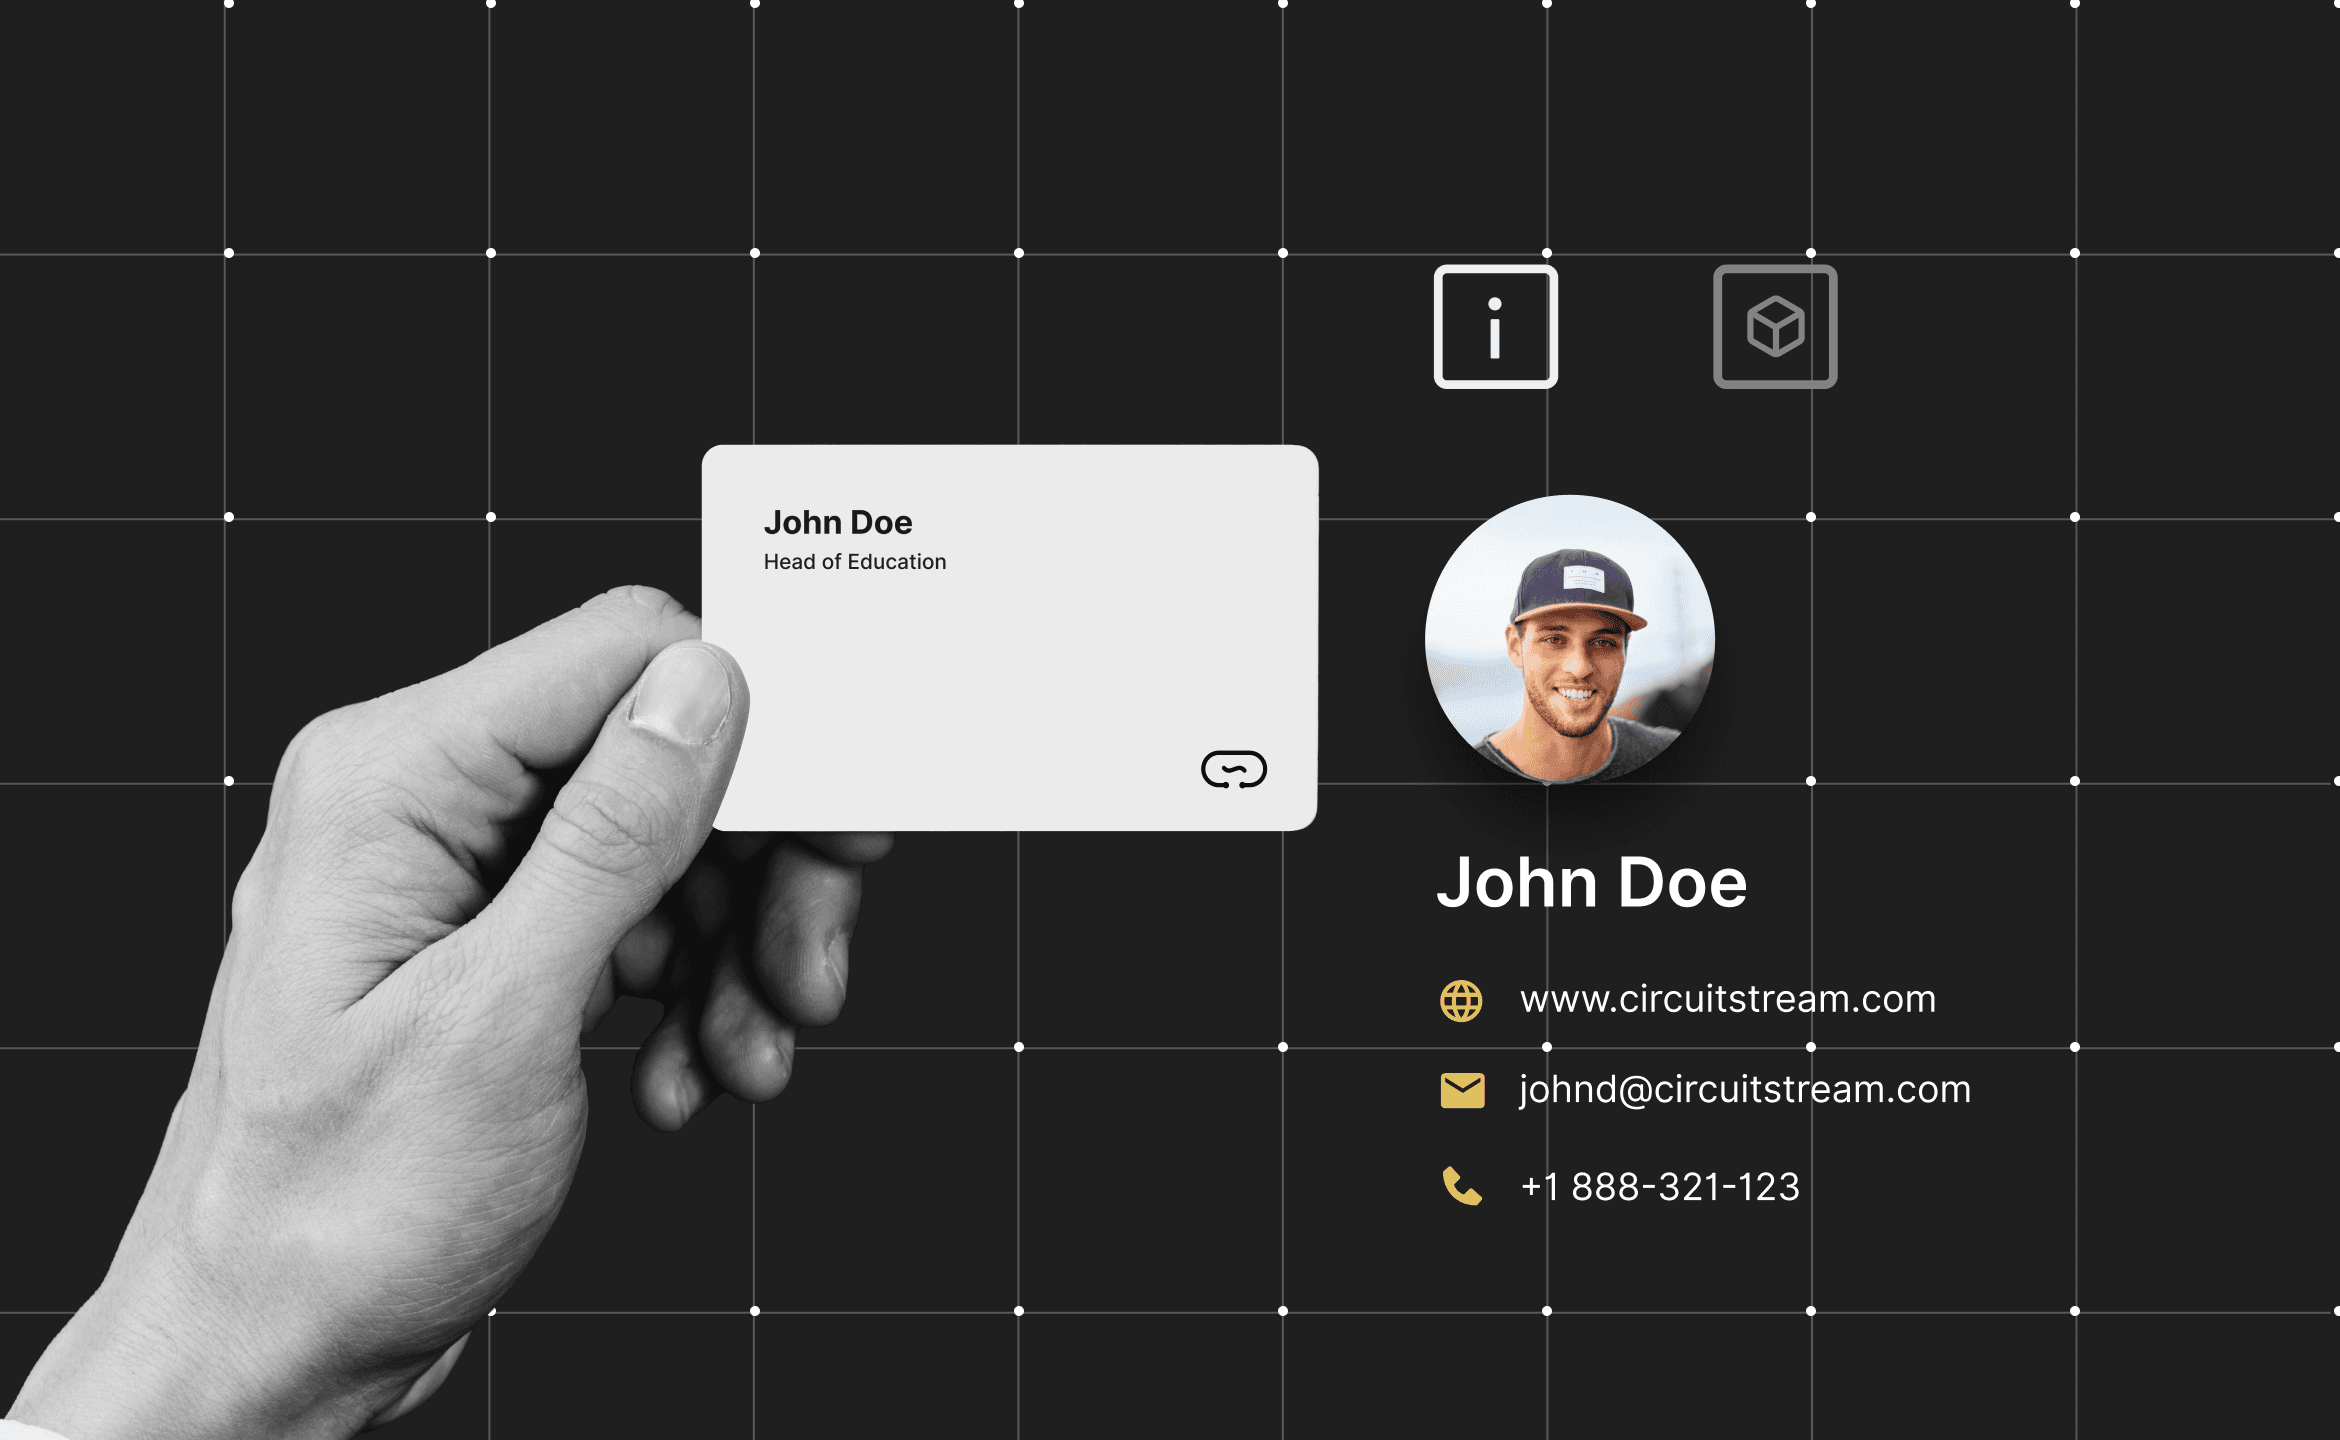
Business cards are pretty much dead. They have been around forever and they don't do much for creating great impression. With many other means of sharing contact details or business information, exchanging these obsolete pieces of papers will at best get the other person snapping a photo of the card and promptly throwing it away.
In the age of technology, to make these babies work, you gotta step up your game. We need to do something better.

That's why we are going to build an augmented reality business card. It's got a wide range of options. It's not just a great marketing tool, but you can surprise your family with AR postcards.
Here's how you build a Merry Christmas AR postcard, for example.
Table of Contents:
AR takes your content to a whole new level, allowing you to add 3D Objects, animations, interactions and what have you, on top of that same old boring physical business card, and all of this moves together with the physical card, as if they were as real as the card itself.
Best thing, all you need to do is a free version of Unity with a couple of API and a phone's camera (either iOS or android devices are fine). You don't need to a special ar designer — you just need to slap a QR code on it.
Now you can add even more info about yourself and do that in a striking manner! Sometimes the ideal product presentation is you - and what's the better way to impress your potential customers, than with a memorable tech app.
How Do AR Cards Work?
Using live image tracking technology, available for both Iphone and Android, using their respective techs ARKit and ARCore, the application is able to detect and track your card, allowing you to attach anything you’ve come to expect from mobile apps to the tracked image, be it more info, some dope interactive AR experiences: from animations or even a mini game.
After creating an app with this tech, it’s just a matter of pointing the phone's camera to your card and watching the magic happen on the screen of a mobile phone.
This is really just the tip of what ARKit and ARCore can really do, but is already a huge improvement on a dying means of communication.
How To Make Your Own 3D Animated Cards
Fortunately for us, creating an AR Business Card is pretty easy, thanks to Unity and one of it’s packages, ARFoundation, that leverages and abstracts the many ARKit and ARCore features, with simple to use and platform agnostic ar components.
To create an AR card (or postcard) all you need is a working PC with Unity Engine, any asset you might use (3D models, extra images, ...), a physical business card, and some cool ideas! Imagine showing your animated social media accounts (Twitter, Facebook, Instagram or LinkedIn) beside just your contact information.
No code required..
AR Card Tutorial
Step 1: Design your Business Card
A good AR business card should follow the traditional guidelines for readability, layout and creativity, but it must also be a good image target for AR tracking, lucky for us, here are some guidelines and best practices on that.
Step 2: Unity Project Setup
Download and install Unity, make sure to add support for building to your desired platform (Android / Iphone). In this example we are using version 2019.4.16f, targeting Android.
Create a new project from the Universal Render Pipeline template.
Switch the project target platform to Android or iOS.
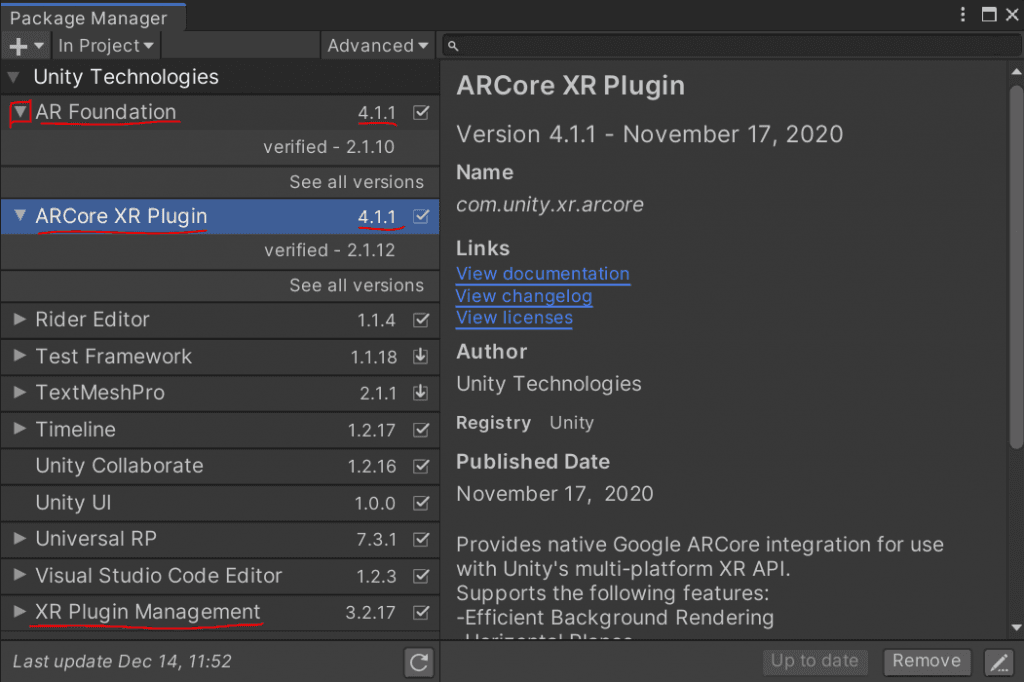
Install the following Packages:
XR Plugin Management
ARCore / ARKit, version 4+.
AR Foundation
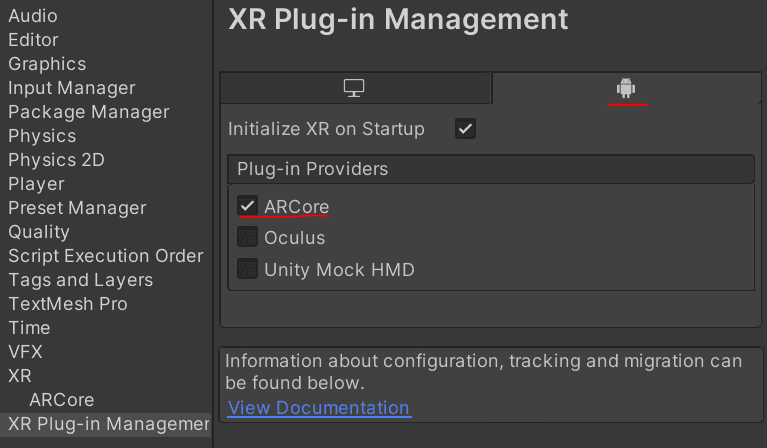
Configure the XR Plugin Management:
Access the Project Settings window (menu: Edit > Project Settings).
Select the XR Plugin Management tab on the left.
Under the desired platform, check ARCore / ARKit plug-in.
Step 3: Create the AR Reference Library
The AR Reference Library is where you configure which images should be tracked by the ARKit / ARCore libraries.
From the Project window, create a Folder called “Textures” inside the “Assets” folder, and move your business card image there.
Under the folder called “Settings”, right click and Create > XR > Reference Image Library.
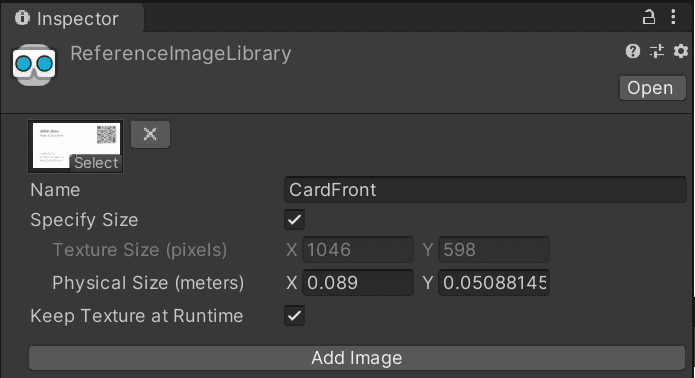
With the Reference Image Library selected, on the Inspector window, hit “Add Image”.
Click the “Select” button inside the square, and find and select your business card image.
On the name field add “BusinessCard”.
Check “Specify Size”, and input the real world dimensions of your card.
Check “Keep texture at Runtime”.
Step 4: Create an AR Scene
A scene in Unity contains the objects of your application, and in our case will be used to add the necessary components that make AR work.
Under the folder called “Scenes”, right click and Create > Scene and name it ARScene.
Double click the ARScene, and let’s start adding the AR components needed.
Right click the hierarchy window and XR > AR Session.
Right click the hierarchy window and XR > AR Session Origin.
Delete the main camera.
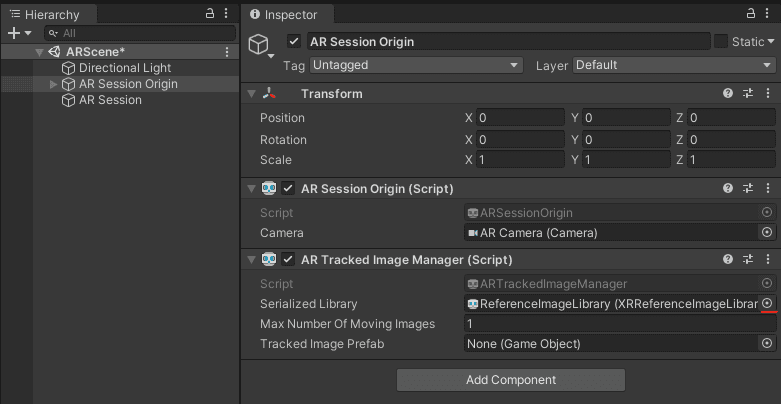
Select the “AR Session Origin” object, on the Inspector window click “Add component” and choose “AR Tracked Image Manager”.
Click the circle with a dot on the field “Serialized Library” of the newly created component, and choose the only entry (that is our previously created Reference Image Library).
Set “Max Number of Moving Images” to 1.
We will set the “Tracked Image Prefab” in a bit.
Step 5: Create Tracked Image Prefab
Now we need to create what will actually be created when the AR Foundation detects the tracked image. Unity has a prefab feature for this.
Right click the hierarchy window and hit “Create Empty”.
Right click the created gameObject, hit “Rename” and change it to “ARBusinessCard”.
Right click the ARBusinessCard gameObject, and hit “3D Object > Quad”.
Rename the Quad to “CardReference”, and let’s edit its components from the inspector window.
Change the X rotation to 90, and the scale to match your business card size. Here 1 means 1 meter, so a default card of 3.5” x 2” would be equal to 8.9 cm x 5.1 cm, and on the inspector 0.089 x, 0.051 y, 1 z.
Now we create a material so this quad displays the image of your business card, then we can use it as reference to the AR effects we lay on top of it. The “CardReference” is only meant to be a reference during development, when you actually build for production, remember to deactivate it.
From the Project window, Inside the Materials folder, Right click and hit “Create > Material” and name it “ReferenceMaterial”.
With the newly created material selected, on the Inspector window, click the circle with a dot right beside the “Base Map”, and find and select your business card image.
Select the CardReference gameObject in the Hierarchy window, and on the Inspector window click the circle with a dot on the field “Element 0” under Materials in the Mesh Renderer component, find and select the previously created “ReferenceMaterial”.
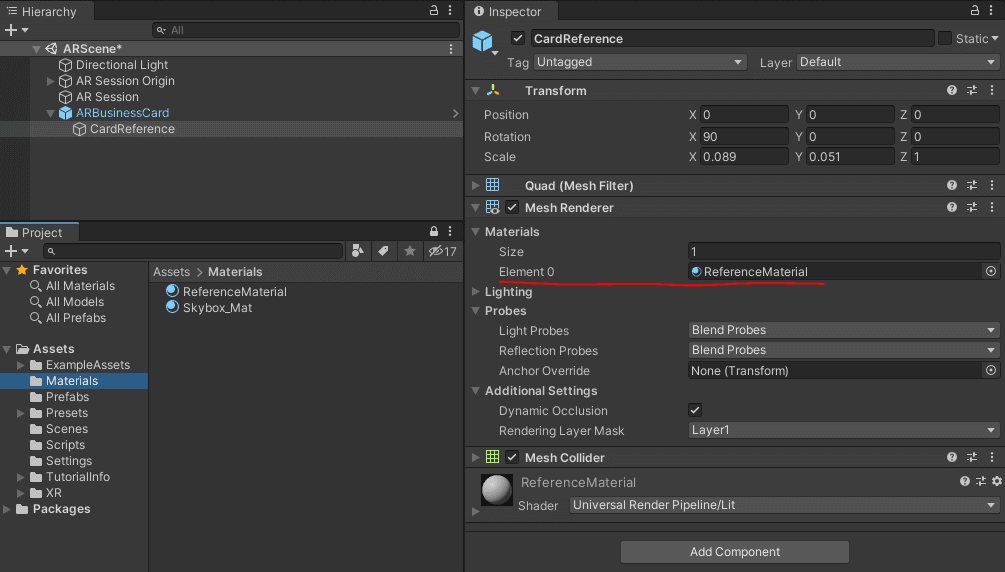
From the Project window, create a Folder called “Prefabs”, and drag the “ARBusinessCard” gameObject from the Hierarchy window to the newly created “Prefabs” folder, the gameObject should turn blue on the Hierarchy.
Now we just need to tell the AR components to use this prefab when it detects the tracked images.
With the “AR Session Origin” selected on the Hierarchy window, drag the newly created “ARBusinessCard” from the Prefabs folder to the “Tracked Image Prefab” field we left blank earlier.
Step 6: Make it Pop
With the previous setup you are ready to create your custom AR Card experience, any 3D Model, animation or effect you add to the prefab will appear when your card is visualized through the app.
The possibilities are endless, here are some Unity features that might help you:
The example shown in the initial gif is made entirely of prebuilt Unity features, and requires no code whatsoever. You can get the project here, or through github repository.
Step 7: Build and Test your app
Finally we need to build our app.
Setup ARCore build settings following these instructions for android.
Open the Build Settings windows through “File > Build Settings”.
Delete any scene that might be on the Scenes in Build, then click “Add Open Scenes” which should add our ARScene to that list.
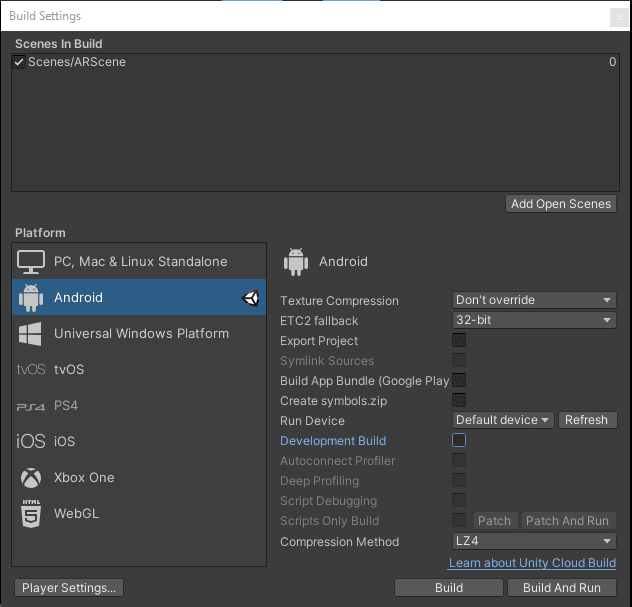
Make sure your mobile is connected to the pc, hit Build and run, choose a location to create the build files and wait for it to complete.
The app should open automatically when the process is complete, then just point it to your business card, and watch the magic happen.
Where to next?
AR is a promising technology with many usages yet to be explored. For more cool AR tips, check our workshops on workshops page and follow the AR Holiday Postcard example project being done from start to finish.
Serious about becoming a professional AR/VR developer? Download our 10-week XR Development with Unity syllabus.

